The Lazy Person's Guide to Machine Learning 🚀
🤖 Machine learning is a powerful tool for making predictions and extracting insights from data. However, building and evaluating machine learning models can be a time-consuming and tedious process, requiring expertise in programming, data preprocessing, and model selection. 😩 PyCaret is a Python library that aims to simplify and streamline the machine learning process by providing a high-level API for common machine learning tasks, such as data preprocessing, model training, and model interpretation. 🤗
In this blog post, we will demonstrate the key features of PyCaret on the telecom_custom_churn dataset, a classic binary classification problem in the telecom industry. 📊
Setting up PyCaret 🛠️
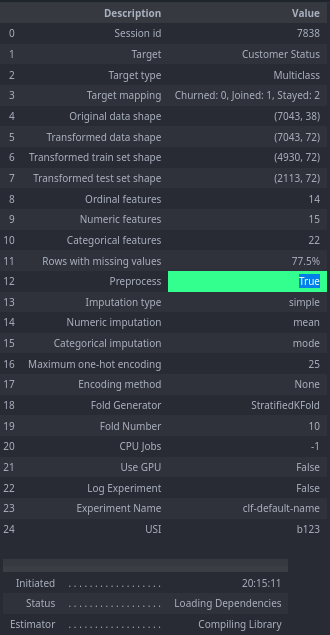
The first step in using PyCaret is to install it using pip and import it into your Python environment. Once you have installed PyCaret, you can load the telecom_custom_churn(I chose this because i recently did some EDA on it here) dataset using the pycaret.datasets.get_data function and set up your PyCaret environment using the pycaret.classification.setup function. 🐍 The setup function performs automatic data preprocessing tasks such as missing value imputation, feature encoding, feature scaling, and feature selection, making it easy to prepare your data for machine learning. Here’s an example of how to set up your PyCaret environment:
pip install pycaret
from pycaret.datasets import get_data
from pycaret.classification import setup,compare_models

data = get_data('telecom_customer_churn')

clf = setup(data,target='Customer Status')

best_model = compare_models()
Comparing Models 🤔
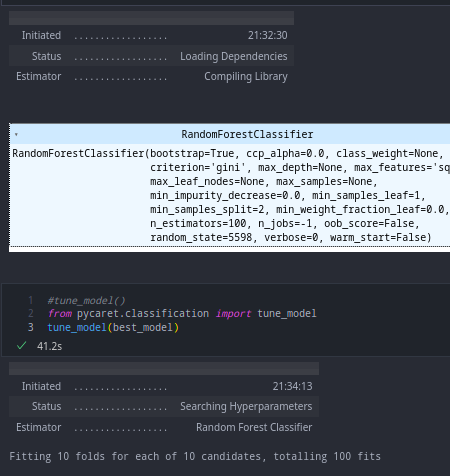
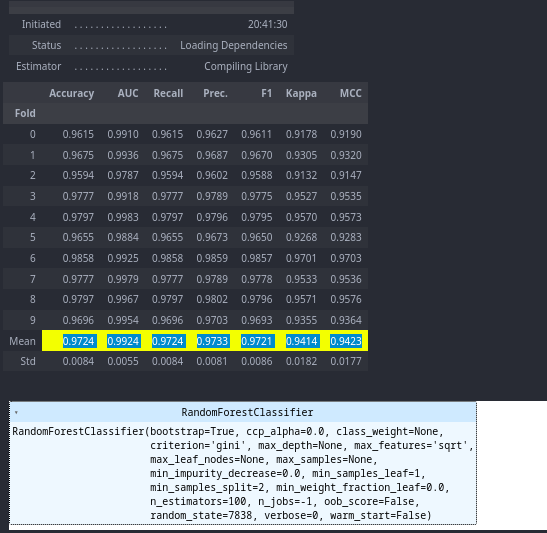
Once you have set up your PyCaret environment, you can train and evaluate several machine learning models using the pycaret.classification.compare_models function. This function gives you the parameters by which the model it thinks is best model. You can also use tune_model() to do 10 fold cv for 10 different combinations 😎 Here’s an example of how to compare several classification models using PyCaret:
best_model = pycaret.classification.compare_models()
The following performs various preprocessing steps such as splitting the dataset into training and testing sets, imputing missing values, encoding categorical variables, feature scaling, and more.
clf = setup(data,target='Customer Status')
Creating & Interpreting Models 🕵️♀️
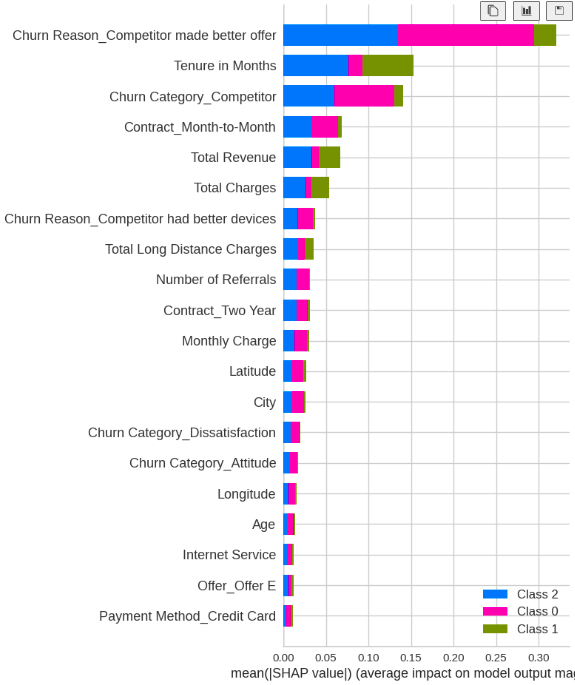
After selecting the best-performing model, you can use the pycaret.classification.interpret_model function to understand how the model is making predictions. This function generates several plots and charts that can help you understand the importance of different features in the model and how they are affecting the model’s predictions.The create_model function in PyCaret can create a wide range of machine learning models for different tasks. Here’s a list of some of the models you can create using create_model:
- Linear Regression
- Logistic Regression
- Ridge Regression
- Lasso Regression
- Elastic Net
- Least Angle Regression
- K-Nearest Neighbors (KNN)
- Naive Bayes
- Decision Tree
- Random Forest
- Extra Trees
- Gradient Boosting
- Extreme Gradient Boosting (XGBoost)
- Light Gradient Boosting Machine (LightGBM)
- CatBoost
Note that the available models may depend on the specific PyCaret version and any additional packages you have installed. You can also customize the hyperparameters of each model using the tune_model function in PyCaret to optimize their performance on your specific dataset. Here’s an example of how to interpret a random forest classifier using PyCaret:
rf_model = pycaret.classification.create_model('rf')
pycaret.classification.interpret_model(rf_model)
Saving and Deploying Models 💾
Once you have trained and evaluated your machine learning model, you can save it using the pycaret.classification.save_model function and deploy it as a web service, API, or standalone application. PyCaret provides several deployment options, such as Flask, FastAPI, Streamlit, and REST API, making it easy to integrate your machine learning models into your applications.
save_model(best_model,'model')
Let’s see how to load the model and predict the output
Loading the model
import pickle
with open('model.pkl', 'rb') as f:
    model = pickle.load(f)
Loading the data
from sklearn.metrics import accuracy_score
X = data.drop('Customer Status',axis=1)
y = data['Customer Status']
Preprocessing the data
import pandas as pd
X = pd.get_dummies(X,drop_first=True)
y = pd.get_dummies(y,drop_first=True)
X_train,X_test,y_train,y_test = train_test_split(X,y,test_size=0.2)
X_train = X_train.fillna(0)
X_test = X_test.fillna(0)
model.fit(X_train,y_train)
model.score(X_test,y_test)
And we got the score as 0.950319375443577 ! which is not the highest but yea it works !
Conclusion 🎉
Now that you know the basics of PyCaret, you can start exploring its advanced features and use cases. With PyCaret, you can take your machine learning skills to the next level and tackle complex problems with confidence.
So what are you waiting for? Go ahead and try out PyCaret on your own datasets, and let us know how it goes!
Happy modeling! 🚀👨💻🔬